


57 Trading Candlestick Patterns Every Trader Should Know
Master 57 essential Trading Candlestick Patterns to improve your chart reading skills and make more informed trading decisions.

You open a candlestick chart and see rows of candles, wicks, and bodies, but you cannot tell which moves will lead to profit and which are just noise. Mastering Trading Patterns such as Doji, Hammer, and Engulfing, reading price action, and spotting trend-reversal and continuation chart patterns turn uncertainty into clear entry and exit signals.
This guide gives practical steps to spot and trade 57 candlestick patterns with confidence, use support and resistance, volume, and timeframes to filter false signals, boost win rates, and turn market signals into profitable trades — ready to sharpen your edge?
To put those skills to work, Aquafutures offers funded accounts for futures trading that provide real capital, straightforward risk rules, and room to scale winning setups so you can practice pattern recognition and trade with confidence.
Summary
- Treat candlestick formations as a taxonomy rather than a checklist; the full catalog covers 57 distinct patterns organized by market behavior so you can classify price response and build rule-based setups instead of chasing every curve.
- Prioritize a small, high-probability subset rather than memorizing everything. Trainers often focus on 16 core patterns, and the practical approach is to master three patterns that align with your horizon before layering in complexity.
- Turn recognition into trades with crisp rules and sizing. For example, aim for a 6 percent target, size so a full stop risks no more than 0.5 percent of equity, and validate those rules on an initial 50 simulated trades to measure slippage.
- Execution realism matters more than signal beauty; run at least 200 simulated fills and collect a 25 to 50 trade live sample in the exact contract and session before increasing size to ensure the edge survives fills and slippage.
- Liquidity and session context change a candle’s meaning, avoid the first 15 minutes of the session for most entries, require follow-through on volume above the 60th percentile, and align stops to ATR-based volatility.
- Patterns are widely used but rarely profitable without disciplined testing. Over 70 percent of traders reportedly use candlestick patterns, and disciplined execution with realistic fill assumptions can improve trading accuracy by up to 30 percent.
- This is where Aquafutures's funded accounts for futures trading fit in, providing realistic simulation and fast access to capital so traders can validate execution-forward tests with the 200 simulated fills and 25 to 50 live fills recommended before scaling.
57 Trading Candlestick Patterns Every Trader Should Know

They are a practical inventory of specific price-action signatures, organized to help you spot real entry and exit opportunities rather than chasing every curve on the chart. Used correctly, the list becomes a toolkit of execution-ready setups you can pair with strict stops, defined profit targets, and realistic slippage assumptions.
1. Marubozu Candlestick
A Marubozu candlestick has a full-bodied structure with no noticeable shadows, with the opening price at one end of the range and the closing price at the other. This shape highlights total control by one force—buyers drive prices steadily higher in a white version, or sellers force them lower in a black one. It emerges from powerful directional pushes that leave no room for pullbacks. Spot this pattern after a price slide for a white Marubozu, hinting at buyers stepping in forcefully to challenge the decline. A black one capping a rally suggests that sellers are completely overwhelming the bulls. Watch the following bar: if it builds on momentum with a close beyond the Marubozu extreme, it reinforces the directional bias toward continuation or a shift.
2. Doji Candlestick
A Doji candlestick appears when the opening and closing prices are nearly the same, creating a small body with extended shadows on either side. This setup captures a standoff where buyers and sellers battle fiercely but end in a draw, revealing market uncertainty. The varying shadow lengths highlight the intensity of intraday swings that fail to produce a clear winner. Positioned at the peak of a rising move, a Doji hints at fading upward drive and possible downturn. Down at a trough after declines, it points to easing selling force and budding recovery potential. Always pair it with the next bar's action—a decisive break above or below confirms the likely path forward.
3. Dragonfly Doji Candlestick
The Dragonfly Doji stands out with its long lower shadow and no upper one, opening and closing, hugging the session high. Sellers plunge prices deep, but buyers rally back fully, slamming the door on further drops. This rejection of lows underscores hidden buying strength amid apparent weakness. Emerging from a slump, this pattern signals a shift as demand aggressively outstrips supply. Mid-decline, it shows resilient support, holding firm. Seek validation from a follow-up green bar piercing above its peak, especially with surging activity, to trust the upward pivot.
4. Gravestone Doji Candlestick
A Gravestone Doji forms with open and close near the session low, topped by a lengthy upper shadow and scant lower one. Buyers spike prices upward only for sellers to crush the advance by close, exposing failed rallies—the towering wick marks an apparent dismissal of higher levels. Atop an advance, it warns of crumbling bullish resolve and looming reversal. During a drop, it reinforces bearish flow. Confirm with a red bar dropping below its base—paired with heavy turnover, it solidifies the downward turn.
5. Long-Legged Doji Candlestick
This Doji variant features oversized upper and lower shadows flanking a negligible body, with prices moving sharply yet settling near the start. Both camps aggressively probe extremes without gaining ground, fueling intense volatility. The sprawling wicks scream hesitation at peak tension. Near overhead barriers, it signals stalling rallies ripe for pullbacks; at floors, it hints at spent declines. Direction emerges only post-breakout—watch for a strong push beyond either end to dictate the next surge.
6. Pin Bar Candlestick
The Pin Bar features a slim body and an outsized wick that dominates two-thirds or more of its span, sharply rejecting one extreme. A lower-tail version closes high after probing depths, while an upper-tail one settles low post-skyward test. It lays bare one side's collapse under pressure. Bullish types shine at bottoms, bearish at crests, with amplification from key zones such as trends or averages. The tail's snapback builds conviction for counter-moves. A confirming bar in the favored direction, backed by volume, locks in the trade setup.
7. Hammer Candlestick
The Hammer emerges with a compact body perched at the upper end of its range, trailed by an elongated lower shadow at least double the body's size and minimal upper wick. After probing deep lows, prices rebound sharply to close near highs, showcasing sellers' failed assault. This structure reveals underlying buyer resilience amid bearish tests. Surfacing during a downswing, the Hammer flags potential exhaustion of declines as demand resists further decreases. Its potency grows near support floors or oversold zones. A subsequent bullish bar that surpasses its peak validates the turnaround, prompting traders to look for upward moves.
8. Hanging Man Candlestick
Mirroring the Hammer's form—a small upper body with a prominent lower shadow twice its length—the Hanging Man appears after rallies, hinting at lurking weakness. Intraday dips get recovered by close, yet the deep probe exposes sellers probing for control beneath bullish facades. It cautions that upward steam may falter. Crowning an advance, this pattern suggests that distribution kicks in as bears successfully challenge bulls at lows. Confirmation arrives via a follow-on red bar breaching its bottom, sharpening the bearish reversal cue. Pair it with resistance for heightened alert.
9. Inverted Hammer Candlestick
This pattern flips the script with a tiny body hugging the lower range, crowned by a lengthy upper shadow over twice the body and scant lower wick. Buyers thrust prices skyward only to yield ground by close, yet the bold probe signals emerging defiance against downtrends. It suggests bulls are testing the waters. In a slump's depths, the Inverted Hammer signals a loosening grip by sellers as upside rejection fails to hold—a green follower closing beyond its high cements the bullish promise. Stronger near bases or with momentum hints at reversal plays.
10. Shooting Star Candlestick
The Shooting Star rockets with a small body at the range's base, sporting a long upper shadow dwarfing the body and negligible lower wick. Bulls launch an assault upward, but sellers hammer it back down by session's end, marking apparent upper-level denial. This fizzling spike betrays rally fatigue. Perched at uptrend peaks, it forewarns of topping action as supply overwhelms demand. Validate with a bearish bar dipping below its low, especially amid volume spikes. At ceilings or overbought levels, it screams caution for longs.
11. Bullish Engulfing Candlestick
Spanning two bars, this setup opens with a red candle with a bearish lean, wholly engulfed by a larger green follow-through that engulfs its body. Sellers yield to explosive buying that not only halts the slide but also propels prices well into prior territory. The takeover flips sentiment decisively. At downtrend troughs, it heralds a power shift toward bulls overpowering bears. A break above the second bar's high confirms momentum. Ideal in support roles, this duo sparks optimism for sustained climbs when volume backs the surge.
12. Bearish Engulfing Candlestick
This two-bar setup begins with a green candle riding bullish waves, only for a larger red candle to fully engulf its body. Sellers storm in, erasing gains and driving prices deep into prior ground, flipping control from buyers to bears in one decisive swoop. The engulfment signals a stark handover of momentum. Capping an upswing, it spotlights fading rally fuel as supply crushes demand. A drop below the second bar's low seals the bearish turn, particularly with ramped-up activity. Strongest at resistance caps, it prompts shorts eyeing downside breaks.
13. Piercing Line Candlestick
Starting with a hefty red bar of selling fury, this duo sees a green candle gap lower yet claw back over halfway into the first's body. Bears lead early, but Bulls mount a fierce comeback to close strong, piercing the Bears' resolve. The deep recovery suggests a revival in upward momentum. In a downtrend's pit, it signals sellers hitting a wall as buyers aggressively reclaim territory. A follow-up close above the green bar's top locks in the shift. Potency rises near floors, fueling bets on trend flips.
14. Dark Cloud Cover Candlestick
A robust green bar leads, followed by a red one that gapped higher but plunged past the prior body's midpoint. Bulls push up initially, yet sellers dominate late, clouding optimism with heavy rejection. This partial pierce exposes a cracking upward drive. At rally summits, it warns of distribution as bears infiltrate bullish ranks. Confirmation via a close under the red bar's low sharpens the downturn cue. Hits hardest at overhead barriers, urging caution on holds.
15. Bullish Harami Candlestick
A towering red candle of decline precedes a pint-sized green one nestled entirely inside its range. Selling stalls as the tiny bullish body emerges, squeezing volatility and hinting at trapped bears. The "pregnant" pause suggests brewing buyer resurgence. Bottoming a slide, it flags ebbing bear power with potential stabilization. A breakout above the small bar's high confirms the pivot. Shines at supports, marking spots for accumulation plays.
16. Bearish Harami Candlestick
Following a massive green surge, a compact red bar hides within its body, curbing upside and introducing doubt. Buyers' thrust weakens as sellers nestle in, forming a "pregnant" stall that questions rally's staying power. The containment whispers emerging caution. Topping an advance, it reveals bulls tiring amid seller probes. A breach below the red bar's bottom validates the fade. Reliable near peaks, it sets up for reversals with confirmation.
17. High-Wave Candlestick
The High-Wave candle sprouts a minuscule body amid sprawling upper and lower shadows that tower over it, capturing wild price swings that cancel out by close. Buyers and sellers clash in a frenzy, with no clear winner, sowing doubt amid extreme volatility. This chaotic span dwarfs typical dojis, screaming market turmoil. After sharp runs, it marks exhaustion where forces deadlock, priming for breakouts. At key floors, it hints at buyer defense; at ceilings, seller ambush. Direction clarifies only when it takes a decisive thrust beyond its bounds, turning indecision into action.
18. Tweezer Bottom Candlestick
The Tweezer Bottom unfolds across two candles, with both hitting matching lows, regardless of body color—one often red dipping lower, the other green climbing back. Sellers twice probe the same floor but can't break through, as buyers defend the line fiercely. Those twin troughs tell a clear story: demand holding firm against repeated assaults. Anchored at a downtrend's base, it whispers of bearish fatigue with bulls ready to reclaim ground. A green follower surging past the second bar's peak cements the upward flip. Shine brightest near proven supports, sparking bets on bounces or complete reversals.
19. Tweezer Top Candlestick
This bearish duo mirrors its bottom kin, with twin peaks aligning precisely—one green pushing up, the subsequent red fading away. Buyers test the ceiling twice but surrender each time, sellers capping the advance without mercy. Equal highs scream unbreakable resistance. Perched atop rallies, it flags bullish exhaustion as supply repels upside twice over. A red bar breaching the second's low confirms the downturn. Potent at barriers, it cues shorts for pullbacks or trend breaks.
20. Bullish Counterattack Candlestick
Kicking off with a red bar of selling zeal, this pair sees a green candle gap down yet rally to close at the same level as the prior end. Bears charge early, but bulls parry the thrust, restoring balance by session close. The standoff tilts toward buyer resolve. In decline depths, it highlights sellers stalling as demand counters aggressively. A fresh green piercing the pattern's high validates the surge. Stronger with volume punch, it fuels hopes of reversals at troughs.
21. Bearish Counterattack Candlestick
A green powerhouse leads, trailed by a red bar gapping up before settling at the first's close. Bulls spark a spike, sellers smother it swiftly, matching the prior finish to expose fragile gains. Control swings decisively back to the bears. Crowning upswings, it reveals upside traps as supply absorbs the pop. A close under the second low sharpens the bearish path. Hits hard near ceilings, priming downside momentum.
22. Morning Star Candlestick
This three-bar dawn breaks with a long red seller's march, a tiny indecisive middle (often gapped), then a robust green piercing deep into the first body. Bears dominate first, pause breeds doubt, bulls storm back to reclaim turf. The trio paints fading gloom yielding to light. Bottoming slumps signal supply burnout met by fresh demand. The final green's depth into the opener boosts conviction. Ideal at bases, it ignites rallies with follower strength.
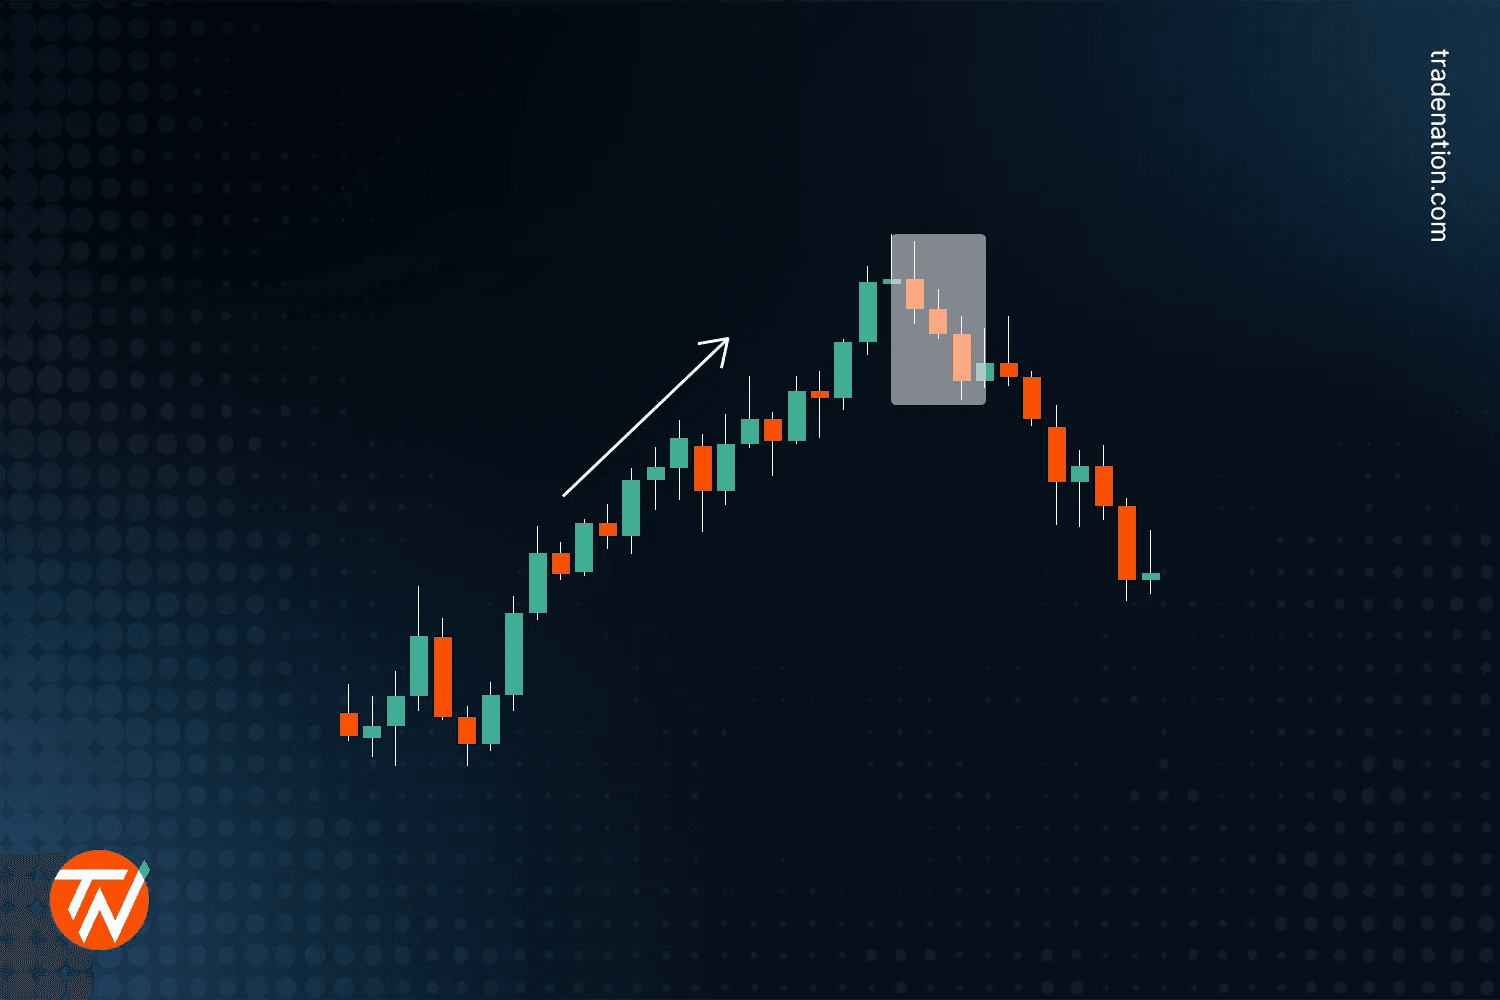
23. Evening Star Candlestick
The Evening Star twilight spans three bars: a tall green bull charge, a small hesitant middle often gapped up, then a hefty red plunging deep into the first body. Buyers peak strongly; indecision creeps in; sellers crush the rally by close. This fade-from-dusk sequence unmasks topping weakness. At uptrend crests, it broadcasts demand depletion as supply surges back. The red bar's bite into the opener heightens reversal odds. Potent near ceilings, it cues downside with confirming drops.
24. Morning Star Doji Candlestick
A beefy red leads this bullish trio, trailed by a Doji gapping below in perfect stalemate, capped by a green powerhouse reclaiming the first's range. Sellers exhaust, perfect balance pauses, buyers ignite the rebound. The Doji's isolation sharpens the pivot drama. In slump nadirs, it amplifies standard stars with pure indecision. Deep green penetration seals the shift. Shines in support, priming stronger bounces than the basic versions.
25. Evening Star Doji Candlestick
Green strength opens, a gapped-up Doji freezes action, then red fury dives into the starter body. Bulls wane, deadlock forms overhead, bears seize total command. Doji precision boosts the bearish handover. Over rally highs, it intensifies topping signals via crisp hesitation. The close's depth confirms seller takeover. Reliable at barriers, it sparks corrections with follow-through.
26. Three White Soldiers Candlestick
Three stout green bars march upward in lockstep, each opening inside the last and kissing new highs with tiny upper tails. Steady advances build without retreat, showcasing relentless buyer ranks. This infantry push crushes doubt in one formation. Rising from bases or pauses, it heralds commanding uptrends with layered conviction. Climbing volume across the trio bolsters the charge. Watch for overreach, but it thrives post-declines.
27. Three Black Crows Candlestick
Mirroring soldiers darkly, three fat red candles descend, opening mid-prior body and slamming session lows with slim lower shadows. Unyielding seller waves erode every gain, forming a grim procession. The trio of ravens signals total capitulation. Descending from peaks, it warns of entrenched downtrends as supply layers deepen. Rising activity seals the gloom—strongest after rallies, cueing sustained drops.
28. Rising Three Candlestick
This five-bar bullish continuation opens with a long green powerhouse, three minor red pullbacks huddled within its body, then a final green blasting past the opener's high. Buyers lead strongly, sellers nibble harmlessly, bulls resume dominance unchallenged. The tight retrace proves trend resilience. Mid-uptrend: it frames healthy pauses in which dips fail to dent the advance. The closer's surge above the first confirms unbroken momentum. Ideal in strong flows, it extends rallies with fading counter-volume.
29. Falling Three Candlestick
Bearish twin to Rising Three: a thick red starter, three tiny green bounces trapped inside, capped by a red monster dropping below the first low. Sellers dictate, buyers' flickers fizzle, bears reclaim full throttle. Contained recovery underscores downtrend grip. During declines, it reveals feeble rallies crushed by supply. Final bar's breach locks continuation. Thrives in bear channels, signaling deeper plunges ahead.
30. Tasuki Gap Candlestick
Bullish Tasuki gaps up between two greens, third red nibbles the space without filling it entirely. Bears poke but can't erase the void, leaving bullish intent intact. The partial retreat preserves directional thrust. In surging trends, the gap's survival shouts momentum endurance. A fresh green over the red bar resumes the march. Potent in established moves, ignoring minor tests.
31. Mat Hold Candlestick
Five-candle bullish hold: long green launch, three mixed smalls drifting shallowly above the base, final green soaring past the opener. Pause consolidates without surrender, breakout reaffirms control. Sellers' grip slips entirely. Uptrend pauses evolve into fresh legs when the capstone clears highs. Shallow dips distinguish it from deeper retraces. Reliable for spotting trend riders' brief breathers.
32. Bullish Abandoned Baby Candlestick
Rare three-bar gem: long red decline, Doji gapped isolated below, green rocket gapped up piercing the first body. Sellers cap out, limbo sets in, and buyers abandon the pit for higher yields. Dual gaps seal the dramatic flip. Downtrend bottoms explode with this isolated Doji pivot. Green's depth in the opener validates the leap. Scarce but sharp at supports, igniting fierce reversals.
33. Bearish Abandoned Baby Candlestick
This scarce bearish trio starts with a long green surge, an isolated Doji gapped above, then a red beast gapping down to invade the first body deeply. Buyers peak out, suspense hangs, sellers orphan the high for lows. Twin gaps frame the ruthless rejection. At rally summits, the detached Doji heralds a supply explosion. Red penetration confirms the plunge. Elite at resistances, it releases corrections with rare precision.
34. Three Outside Up Candlestick
A bearish opening yields to a massive green engulfing it, followed by another green pushing higher. Sellers falter, bulls engulf and extend, sealing dominance in triplicate. The layered takeover crushes downtrend remnants. From decline floors, this amplified engulfing duo sparks vigorous climbs. The third bar's advance locks reversal strength. Potent near bases drive sustained upswings.
35. Three Outside Down Candlestick
The green starter gets swallowed by a giant red engulfment, trailed by a deeper red close. Buyers flicker, sellers overrun twice over, forging bearish supremacy. The engulf-confirm sequence buries upside hopes. Over uptrend highs, it amplifies engulfing power for sharp downturns. Follower depth cements the shift. Strikes hard at ceilings, fueling pullbacks.
36. Three Inside Up Candlestick
A significant red decline hosts a small green Harami inside, then a bigger green breaks above the first high. Selling stalls in embryos, buyers hatch and soar. The nested breakout evolves hesitation to thrust. Bottoming slumps, it refines Harami with a confirming surge. Clearance above the opener validates the pivot. Reliable support for trend turns.
37. Three Inside Down Candlestick
Big green rally cradles a tiny red Harami, capped by a red bar breaching the first low. Buying wanes in confinement, sellers break free downward. Inner doubt blooms into confirmed fade. Topping advances, this Harami upgrade warns via downside confirmation. Drop below the starter sharpens the bearish case. Strong near peaks for reversals.
38. Bullish Kicker Candlestick
This dramatic two-bar shift opens with a hefty red seller's advance, followed by a green bar gapping sharply higher from the prior open and powering to new highs without overlap. Bears rule the first session, but bulls jolt the market awake with an abrupt takeover. The stark void between bars underscores an instant sentiment flip. Emerging from a downtrend, it signals a significant news-driven reversal as demand overwhelms supply overnight. Holding above the green body's base in follow-ups cements the rally. Rare but explosive at troughs, it launches fresh uplegs.
39. Bearish Kicker Candlestick
A towering green bull run precedes a red bar gapping steeply lower from the opener, closing deep with no touchback to the prior body. Buyers dominate early; sellers use shock therapy to carve a clean break. The gap broadcasts total rejection of upside-down dreams. Capping rallies, it flags sudden bearish catalysts that crush optimism. Stays below the red low confirms the slide. Potent at peaks, especially overbought, sparking sharp corrections.
40. Bullish Belt Hold Candlestick
A single long green candle ignites from its session low with no lower tail, surging to close near highs and dominating the range. Initial selling meets zero resistance as buyers claim total command from the bell. The shadowless base evokes a belt cinched tight for battle. At decline bottoms, it signals a smooth buyer takeover, either for reversals or for uptrend fuel. A green follower pushing higher validates. Thrives near supports, boosting continuation bets.
41. Bearish Belt Hold Candlestick
This lone red powerhouse launches from its high sans upper wick, plummeting to hug lows across a broad span. Opening optimism evaporates under seller onslaught, leaving no trace of highs—the wick-free top straps bearish resolve. During upswings, it exposes an immediate supply crunch for downturns or downtrend acceleration. Red sequel below locks it in. Strikes at resistances, priming shorts.
42. Doji Star Candlestick
A momentum bar—green or red—yields to a gapped Doji detached from its body, freezing action in limbo. Trend thrust stalls into pure balance, shadows probing without commitment. The separation amplifies brewing doubt. Post-strong runs, it hints at exhaustion at highs for bearish turns or lows for bullish turns. Break by next bar dictates path—opposite the starter. Context at key zones sharpens edges.
43. Bearish Doji Star Candlestick
A robust green momentum candle leads to a Doji gapped upward, hovering detached with balanced shadows and no body overlap. Bulls drive hard, then deadlock forms overhead, exposing rally fragility. The boostd stall whispers fading conviction. At uptrend summits, it flags buyer burnout, priming bearish pivots. A red follower piercing below the Doji confirms the drop. Strongest near ceilings, it cues reversals with volume backing.
44. Matching Low / Matching High Candlestick
Twin candles seal identical closes—lows in declines or highs in rallies—creating mirrored endpoints despite body variance. Trend probes the level twice without breakthrough, etching equilibrium lines. Repeated pins highlight defensive standoffs. Downtrend Matching Lows signal seller stalls for bullish flips; uptrend Highs warn buyer caps for bears. The third bar opposite the trend validates. Potent at floors/ceilings, sparking shifts.
45. Inside Bars Candlestick
A wide-ranging "mother" bar contains the next candle fully—high to low nestled inside—compressing volatility into a tight coil—expansion yields to contraction, coiling tension between forces. The snug fit builds breakout anticipation. In trends, it pauses for continuations; at extremes, reversal setups. Break beyond mother extremes dictates direction, favored with trend alignment. Volume surge on thrust enhances reliability.
46. Three-Line Strike Candlestick
Three steady trend-aligned candles—greens up or reds down—meet a massive counter bar engulfing all three bodies. Momentum builds, then shock reversal swallows the progress whole. The dramatic counter traps the unwary. Often fakes out as a reversal but resumes the original trend after absorption. Break back through the striker's midpoint confirms continuation. Rare traps shine in strong flows.
47. Bullish Separating Lines Candlestick
Red decline opens a green bar at the same level, then rockets higher to dominate. Sellers dip, buyers match the start and surge past, severing bearish chains. Identical launches flip control smoothly. Mid-uptrends absorb selling for bullish persistence. Followers above the green high cement flow. Reliable above rising averages, fueling extensions.
48. Bearish Separating Lines Candlestick
A green recovery bar launches a red candle from the same open, plunging deep to crush upside-down hopes. Buyers flicker briefly, sellers sync the start and seize total command downward. Matched launches expose demand's instant crumble. In downtrends, it quashes rallies and signals a bearish resumption. Drop below the red low by followers confirms persistence. Potent below falling averages, driving further declines.
49. Meeting Lines Candlestick
Opposite-color duo in which the second gaps with the trend but rallies back to kiss the first's close precisely. Momentum surges then retreats to equilibrium, bodies clashing at the finish line. The precise rendezvous signals a brewing standoff. Downtrend: red-to-green. Meeting hints at a bullish reversal; uptrend: green-to-red—Warns of a bearish reversal. The third bar counter-trend breakout determines the outcome. Shines at support and resistance levels for pivots.
50. On-Neck Candlestick
Long red plunge trailed by a small green opening lower, closing right at the prior low's neckline. Sellers dominate, buyers nibble weakly without piercing support. The precise touch keeps bears firmly in charge. Mid-declines, it frames feeble bounces crushed for continuation. Fresh red below the low seals the path. Reliable in bear channels near breakdowns.
51. In-Neck Candlestick
Red powerhouse yields to a tiny green gapping down, closing a hair above the prior close but trapped low. Weak recovery inches up yet stays neck-deep in bear territory. Limited rebound underscores seller supremacy. During downswings, it dismisses minor pops for trend hold. Bearish follower below confirms the slide. Stronger after wide reds, fueling extensions.
52. Thrusting Candlestick
Hefty red leads a green bar gapping lower, thrusting up but stalling below the prior body's midpoint. Bears lead strongly, bulls counter feebly without a halfway breach. Partial push fails to shift control. In slumps, it highlights rejected recoveries for bearish flow. Close under the midpoint by the subsequent red locks continuation. Potent near supports failing to hold.
53. Upside Gap Two Crows Candlestick
A substantial green upthrust gaps to a red bar that fades lower yet stays above the prior close, followed by another red opening inside the first red and dropping back into the green's body. Bulls gap higher, crows swarm twice to fill the void partially. The duo rejection buries breakout dreams. At rally peaks, it unmasks fading momentum as sellers swarm the gap. Third bar's retreat into the opener confirms a bearish turn—reliable near resistances, priming pullbacks.
54. Tri-Star Candlestick
Three Dojis in a row—first aligning with the trend, middle gapping continuation direction, third reversing the gap—form an island of pure deadlock. Triple indecision freezes all action, leaving balanced options in a rare stalemate. Exhaustion etched in a triplicate balance. Post-extended moves, it screams reversal potential at highs for bears or lows for bulls. Fourth bar thrust opposite trend dictates path. Scarce at extremes, demands confirmation.
55. Hikkake Candlestick
Inside bar sets a trap stage; a false break one way lures traps, then a sharp reversal opposite snares the fakers. Compression breeds fakeout; proper direction emerges post-shakeout. Weak hands purged, strong hands prevail. Any context shines, but key zones amplify as traps. A reversal bar beyond the inside high/low confirms a valid breakout. Volume contrast—low on fake, high on real—boosts edge.
56. Ladder Bottom Candlestick
Five-bar climb from depths: three descending red steps, tiny pause Doji or spinner, then green powerhouse surging past. Panic sells in tiers, hesitation forms, and buyers storm the top of the ladder. Selling climax yields to reversal charge. Downtrend pits its flag capitulation exhaustion for bullish pivots. Fifth green's strength above prior bodies seals the shift. Rare post-climaxes ignite bounces.
57. Concealing Baby Swallow Candlestick
Four bearish bars swallow hope: two long reds gap down, a tiny gapped "baby" red, and a final red engulfs the last two. Extreme selling cascades, yet traps bears in overreach. Despite the gloom, it hides a bullish dawn. Steep decline bottoms, this rare trap signals seller burnout for sharp reversals. Follower green above pattern high releasees rally. Potent in oversold panics. Why do many traders struggle despite learning patterns?
This challenge appears across intraday and swing traders: trying to learn every pattern at once overloads working memory and slows decision speed, so setups that looked obvious in tape reading become ambiguous under pressure. It is exhausting when the pattern list grows faster than your execution habits; hesitation costs you edge, not knowledge. The failure point is usually the process, not the lack of signs.
Most traders handle pattern practice in piecemeal ways, using scattered charts and manual notes because it is familiar and requires no upfront change. That works until you scale frequency or seek consistent payouts, at which point fragmented testing, inconsistent risk controls, and untracked slippage create invisible losses. Solutions like funded accounts for futures trading give traders a stable way to test rules at scale, with simulated environments and instant funded accounts letting them iterate faster while keeping payout mechanics predictable.
What are the simplest, highest-leverage habits to adopt now?
Start small and test with purpose. Pick three patterns that appear frequently in your contract and timeframe, build a one-page rule for each, then run 50 simulated trades to measure realized slippage and win rate. Use that empirical result to size live attempts. Treat each pattern like a mechanical strategy: entry, stop, target, confirmation, and stop-loss management. The difference between a flashing candle and a tradable signal is discipline, not discovery. A quick analogy to keep this grounded: patterns are like traffic lights, not fortune tellers. They tell you when the intersection is controlled, not where the car will be in ten minutes. Learn to act on the signal, account for road conditions, and you will start collecting small, repeatable wins.
What do I need to watch for in live markets?
Liquidity and news can turn textbook patterns into traps. Require a follow-through bar and check intraday volume before risking capital. Expect lower reliability during thin sessions and widen stops or skip setups accordingly. That simple discipline protects capital and preserves the chance for fast payouts when your funded account hits targets. You’ll want to keep reading, because the next part uncovers which specific behaviors actually change the odds when you move from paper to real capital.
Related Reading
- What Is a Funded Trading Account
- What Is SMT in Trading
- Price Action Trading
- Intraday Trading Tips for Today
- Can Day Trading Be Profitable
- Trading Indicators
- Forex Trading Candlestick Patterns
- Intraday Algorithmic Trading
- Volatility Trading
What Are Candlestick Patterns, And Why Are They Important In Trading?
Candlestick patterns matter because they give actionable, ruleable signals you can trade, not just pretty pictures. When you treat a pattern as a measured trigger with a clear stop, size, and confirmation checklist, it becomes a repeatable execution step you can scale toward live payouts.
How do we turn messy bars into reliable signals?
Pattern recognition breaks down when traders rely on eyeballing alone, so the answer is rules, not memory. Require objective filters, such as minimum body-to-wick ratios, a volume or volatility threshold, and a timeframe alignment rule, to ensure the pattern aligns with the trade horizon. This approach calms the frustration traders feel when textbook shapes look different in real ticks, and it turns ambiguous bars into binary decisions you can rehearse in simulation. Think of it like instrument flying, not visual sightseeing: one gauge out of range does not trigger a bailout, but a set of failing indicators does.
What risk controls should change when leverage is involved?
If you trade with Morpher, 2025: "10X leverage", position sizing and stop placement must be far more conservative because leverage multiplies both slippage and losses. Use volatility-based stops, size so that a full stop equals a small fraction of account equity, and reduce contract count when implied volatility or spread widens. Practically, treat leverage as a constraint that forces tighter rules: smaller nominal exposure, stricter confirmation, and automatic scale-down when liquidity thins. Most traders manage pattern signals manually because it feels familiar and fast. That works at low frequency, but as trade counts rise, it fragments the edge and hides execution losses. Platforms like funded accounts for futures trading let traders run rule-based pattern systems in realistic simulated environments, test how slippage shifts win rates under live ticks, and then access capital instantly so they can iterate faster without waiting for external approval.
How do you validate a pattern’s edge so it survives live markets?
Measure expectation, not elegance: compute average R, win rate, and drawdown across multiple market regimes, then stress those numbers with slippage and order fill models. Walk forward the rules monthly and reject patterns whose edge collapses when spreads widen or when volume drops. The pain point here is emotional bias: reversal trades look heroic on paper, but this causes outsized losses when the broader market context is ignored, which is why strict confirmation and regime-aware testing matter more than memorizing more patterns.
What small execution habits change outcomes the most?
Adopt a checklist you run in 10 seconds before entry: pattern match, timeframe agreement, volatility stop, size cap, and a placed limit or stop order. Use tiered exits so you lock partial gains and protect the remainder with a trailing stop. These micro-habits convert a visual read into a repeatable trade routine that scales to funded accounts without turning every candle into an opinion. According to N26 Blog's 2023 figure, 5.783% of traders use candlestick patterns to analyze market trends. Mastering them is a rare edge when paired with disciplined execution and proper risk checks. That simple switch from opinion to rules is where most traders either find consistency or lose their edge, and that tension is only the start of what comes next.
Sources:
What Types of Assets Can Be Traded With Candlestick Patterns?
Candlestick patterns can be used across nearly every liquid instrument, but the way you trade them must change with market microstructure, hours, and margin rules so the same setup means different things in bonds, ETFs, or micro e-minis. Treat the candle as a signal that needs three asset-specific follow-ups: what moves the price, how tightly fills occur, and how your stop or target will be hit in live ticks.
1. Stocks and Equities
Stock traders leverage candlestick formations on charts from major exchanges to pinpoint entry and exit points. Daily, hourly, or weekly timeframes reveal patterns like hammers or engulfing candles, signaling potential trend changes amid earnings reports or news events. For instance, a bullish hammer after a downturn in a blue-chip stock often signals a buying resurgence, especially when volume spikes. Research indicates these setups boost strategy success by 10-15% when combined with confirmation tools, as seen in backtested equity portfolios.
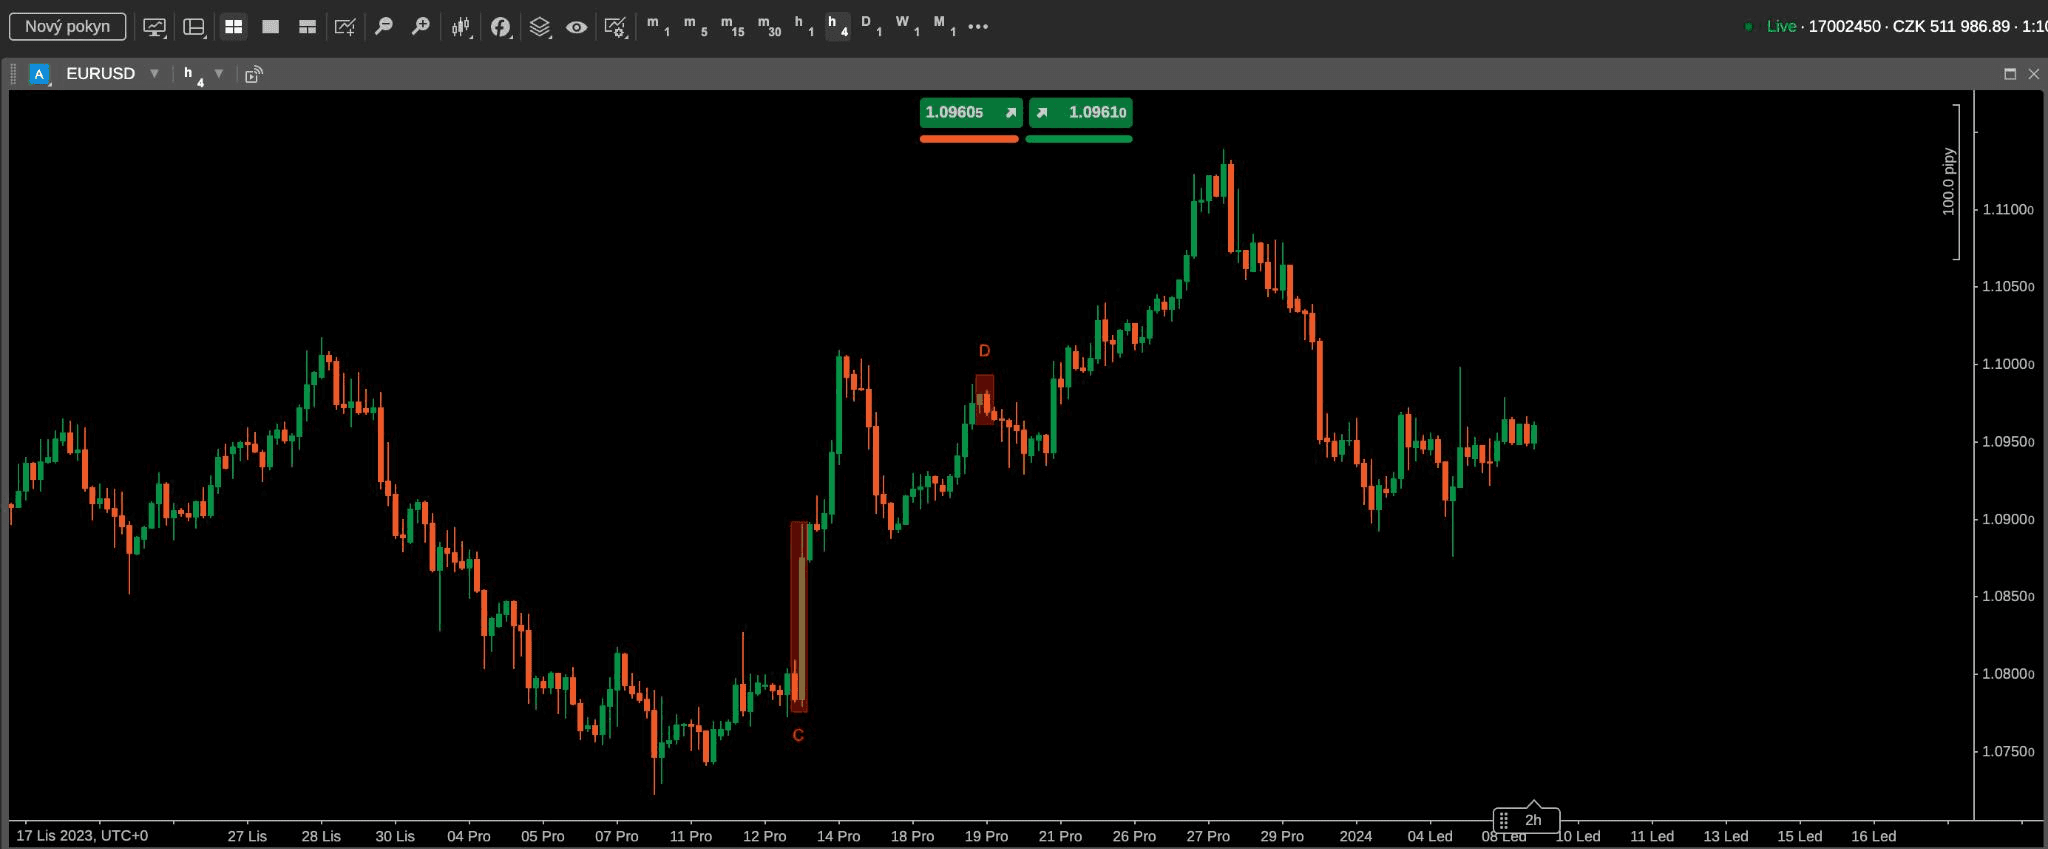
2. Forex Pairs
In the forex market, candlesticks are effective due to continuous trading and high liquidity in pairs such as USD/JPY and AUD/USD. Patterns such as dojis and evening stars highlight exhaustion points, helping traders navigate short-term swings driven by economic data or geopolitical events. These signals cut through noise effectively, with studies reporting over 70% hit rates for star patterns near support zones. Day and swing traders use them to sidestep false moves and capture clean trends in this always-open market.
3. Cryptocurrencies
Crypto markets use candlesticks to track wild price swings and 24/7 trading in assets like BTC or SOL. Volatile setups like shooting stars or inside bars expose rapid sentiment flips, ideal for scalping or holding through pumps and dumps. A breakout above an inside bar's high, for example, often resumes uptrends in altcoins. Traders confirm these patterns with on-chain metrics, turning them into high-reward plays amid the sector's inherent volatility.
4. Futures Contracts
Futures traders analyze candlestick patterns in commodities, indices, and metals such as gold and Nasdaq contracts to forecast directional moves. Patterns guide hedgers and specs alike, timing trades around rollovers or inventory reports. A dragonfly doji at lows in oil futures, say, hints at bullish reversals when shadows test demand zones. Leverage demands precision, and these visuals help manage amplified risks effectively.
5. Options Derivatives
Options enthusiasts use candlesticks to align strategies such as iron condors or calls on underlying assets, from indices to single names. Formations near strikes signal implied volatility shifts, optimizing premium collection or directional bets. Picture a doji hovering at resistance, prompting a put spread entry—candles clarify timing here. This approach minimizes uncertainty in theta-driven plays, aligning with proven edges in derivative backtests.
Which instruments make patterns actionable for short, repeatable targets?
Stocks, ETFs, and large-cap futures often give the cleanest fills and predictable follow-through for modest profit targets because they have deep liquidity and narrow spreads during regular sessions. Conversely, small-cap names, exotic futures, and some altcoins show the same candle shapes, but their fills are erratic, so you must widen stops, reduce size, or skip otherwise textbook setups.
How does market structure change what a candle actually tells you?
This is a pattern you’ll see across day and swing trading: identical-looking candles appear, but their meaning flips when tick size, lot rules, or session overlap change. In fixed-income or options underlyings, for example, quoted spreads and auction mechanics can cause apparent wicks that are never tradable. In plain terms, a rejection wick on a thin contract can be an illusion; on a high-volume contract, it is a tradeable rejection. Read the market’s plumbing before you trust the picture.
What execution adjustments matter by asset class?
If you trade ETFs or broad-index futures, favor limit entries against the pattern with a tight initial stop and a tiered exit that locks partial gains, because those markets fill you predictably. For forex or 24/7 crypto, use more conservative stop placement and smaller position sizing to compensate for off-hour volatility and occasional liquidity gaps. When options are involved, treat the candle as a signal on the underlying, then translate it into option greeks and implied volatility checks before sizing the trade.
Most traders manage pattern practice with fragmented rules and slow iteration. That familiar approach works for a few trades, but as frequency rises, the cost shows up: inconsistent fills, unclear slippage, and buried performance decay. Platforms like instant funded accounts for futures trading provide simulated, high-fidelity fills and a path to capital that compresses iteration time and reveals which patterns survive real ticks.
How should risk controls adapt to leverage and contract specs?
Leverage changes the math, not the pattern. When leverage is in play, apply volatility-based sizing so a full stop represents a fixed fraction of equity, and expect slippage to amplify losses as much as gains. Note the throwaway phrase from some discussions, the odd 100,000 MPH, is a reminder that market quotes can move absurdly fast; plan entries and stops that tolerate sudden speed in thin windows. Also, keep in mind that using 10X leverage makes tiny execution differences into account-moving events, so tighten your confirmation checklist before you scale.
This tension between pattern recognition and real execution is why practice must be structured. This challenge appears across traders: people get stuck repeating the same checklist without measuring the one thing that matters, realized expectation after slippage and partial fills. Record every simulated trade, track how fills differed when you switched order type or session, and iterate until the pattern behaves reliably in the exact contract and timeframe you plan to trade. Think of patterns like camera exposures, not prophecy; the image is useful only if the lens, shutter speed, and lighting match the scene. What you do next—order type, size, stop logic—is the technical work that turns a pretty image into a bankable trade. That next step matters more than recognition, and that’s where the surprises start.
How to Identify Candlestick Patterns
You identify candlestick patterns by turning visual reads into rules: define precise numeric filters for the candle, confirm them across the right timeframes and volume context, then validate the setup against realistic fills and slippage before you risk capital. When those elements align, patterns stop being opinions and become repeatable entry signals you can size, manage, and scale.
What objective tests separate a signal from noise?
Start by measuring the candle against recent market activity, not imagination. Compare the candidate candle range to the 20‑period ATR and require the range to exceed typical noise for that contract, check that the close sits in the expected quadrant of the body for the pattern, and measure the next bar’s follow‑through within a fixed window to reject false positives. Use volume percentiles rather than raw ticks, for example, flagging patterns that occur on volume above the 60th percentile for that session, because a rejection wick without volume is often theater, not conviction.
How should you scan so that patterns appear reliably?
Build pattern templates that combine three conditions: shape, relative size, and session context. Automate alerts that fire only when a pattern appears in both your primary timeframe and a higher timeframe, then batch the results for daily review instead of chasing every ping. Track two simple metrics for each template, false positive rate and realized R, and prune templates that show low expectation after adding realistic fill models.
This common approach works early, but it breaks as you scale.
Most traders test patterns manually because it feels quick and familiar. That works for a handful of setups, but as trade counts climb, the hidden cost becomes apparent: inconsistent fills, unmeasured slippage, and slow iteration that hides whether a pattern truly works in real time. Platforms such as funded accounts for futures trading provide simulation with realistic fills and instant access to capital, letting traders compress testing cycles and see which rules survive real ticks and payout mechanics.
How do you stress-test a pattern so it survives live markets?
Run walk‑forward tests: futures trading accounts provide a simulation with realistic fills and instant access to capital, enabling traders to compress testing cycles and assess and simulate order execution using historical spread and slippage bands, varying order types, and fill delays. Use resampling to determine how outcomes change when a 1 percent slippage event occurs on 10 consecutive trades, and reject setups whose edge evaporates under modest slippage. Remember that execution risk scales with leverage, so if you layer in Morpher, 2025: 10X leverage, you must tighten sizing and confirmation because even minor execution differences can move the account.
What quick habits reduce recognition errors under pressure?
Create a 10‑second checklist you run before every entry: pattern match, higher‑timeframe agreement, session liquidity check, defined stop sized to volatility, and an order type choice. Practice that checklist in simulation for 30 trading days, logging each miss and its cause, then adjust one variable at a time. This discipline turns the chaotic feeling of “it looks right” into a reproducible routine you can execute when your pulse rises.
Why traders feel stuck, and how to break it
This challenge appears across day and swing trading: textbook patterns rarely arrive cleanly in real ticks, so traders oscillate between paralysis and overtrading. The fix is deliberate: narrow your universe to three templates, measure real fills across 50 simulated trades per template, and carry forward only those with stable expectations. That process replaces doubt with data and gives you tradeable confidence, not wishful thinking.
One honest image to hold on to
Think of pattern work like learning to drive in a city, not on a closed track, where you must read traffic, lights, and other drivers while executing a lane change; the candle is only one signal in a moving scene. That’s useful, but the real struggle is turning validated patterns into trades you can execute consistently under pressure.
Related Reading
- Basic Trading Strategy
- Spot Algorithmic Trading
- Forex Trading Profit Per Day
- Crypto Trading Bot Strategies
- Best Forex Trading Bots
- Fair Value Gap Trading Strategy
- Best Leading Indicators for Day Trading
- Best Indicators for Swing Trading
- Best Charting Software for Day Trading
- Best Indicators for Options Trading
How to Trade with Candlestick Patterns?
Candlestick patterns are tradeable in the real world when you treat them like measured signals, not art. They work best as precise execution rules tied to order types, session liquidity, and a validation plan that tests fills and slippage before you scale.
What order types and entry tactics should I prefer?
Pick the order type to match the pattern and the market’s plumbing, not your preference. Use limit orders to capture wicks or buy into pullbacks when liquidity is visible on the depth of market, and use buy stops for breakout-style patterns when you need a clean trigger above the high. For larger size, slice entries into posted limit layers or use small immediate-or-cancel child orders from the DOM to avoid walking the book, and always pair your entry with an OCO bracket so you never leave the stop unplaced during fills.
When are patterns most tradable during the day?
Patterns are more reliable when liquidity and participant commitment are high, typically during regular session overlap and after the opening volatility settles. Avoid the first 15 minutes of the session for pattern entries unless you have explicit rules for opening-range context, and skip discretionary setups in the 10 minutes before major economic prints when quote behavior can flip. Also, check correlations with correlated instruments, as a valid candle in one contract may fail when the underlying index or spread moves.
How should you size, scale in, and scale out so edges survive live fills?
Size to the trade’s execution risk, not nominal stop width. Use fixed fractional sizing combined with a caps-on-drawdown rule so no single candle can take you out of the game. Scale into a confirmed move, for example, layering 50 percent at the first confirmed follow-through and the remainder on a second confirmation, while taking a partial profit to lock gains early. Think in realized R, not win rate alone, and require that your sizing plan preserves a positive expectancy after realistic slippage.
How do you validate a pattern’s edge beyond a simple backtest?
Run execution-forward tests that include order-type simulation and slippage bands, then walk the system forward across contiguous months. Track metrics that matter, such as average slippage in ticks, false positive rate, average time in trade, and maximum adverse excursion, and reject patterns whose expectancy collapses under modest, realistic slippage. Treat 200 simulated fills as a minimum sandbox, then require a small live sample of 25 to 50 fills in the exact contract and session before increasing size.
This problem shows up repeatedly: traders keep adding patterns because it feels productive, but the hidden cost is fragmented testing and invisible execution loss. That familiar approach works at low frequency; however, as you scale, the paperwork multiplies, false positives hide in the noise, and the edge evaporates. Platforms like funded accounts for futures trading provide centralized simulation with realistic fills and an instant path to scaled capital, letting traders iterate faster and see which rules survive live ticks.
What microstructure checks stop the common traps?
Read the tape and depth for the 30 minutes before your entry, not after. If a candidate candle forms on below-average prints and the DOM shows resting liquidity pulled at the pattern extreme, treat it as theater, not conviction. Add a simple liquidity filter, for example, requiring that the pattern occurred on volume above the 50th percentile for that session or that an instrument-specific spread threshold was met, and you cut the number of fake signals without losing many real ones.
How should traders journal and measure progress so emotions stop driving trades?
Log every trade with these fields, at minimum: pattern template, order type used, entry and exit fills, slippage ticks, realized R, time in trade, and the session context. Review weekly for two failure modes: pattern drift and execution loss. The honest test is not how pretty the candles were, it is whether your realized expectancy holds after fills and stress testing using Monte Carlo resamples of your trade sequence.
A few practical rules you can implement this week
- Create three clean templates and automate alerts to avoid chasing noise.
- Add a liquidity filter and an order-type rule to each template.
- Run 200 simulated fills using your intended order types and require positive expectancy after plugging in average slippage.
Think of a pattern like a footprint in mud, not a prophecy; the depth and sharpness tell you whether a truck or a runner passed through, and you trade accordingly. AquaFutures gives traders fast, affordable access to funded futures accounts with instant options, simple rules, and real payouts, whether you want to skip evaluations or grow through performance-based scaling. Join thousands of traders who trust AquaFutures for transparent rules, fast support, and real capital, and unlock up to 50% off your first funded account, plus surprise BOGO deals and weekly bonuses. That’s useful, but there is one performance checkpoint almost everyone misses that changes how you scale from simulation to real capital.
Related Reading
- Fibonacci Trading Strategy
- Best Prop Trading Firms
- ORB Trading Strategy
- Crypto Swing Trading Strategy
- Best Copy Trading Platform
- Best Proprietary Trading Firms for Beginners
- Best Stocks for Options Trading
- Silver Bullet Trading Strategy
- Order Block Trading Strategy
- The Strat Trading Strategy
- Supply and Demand Trading Strategy
- Profitable Gold Trading Strategy
- Higher High Lower Low Trading Strategy
Unlock up to 50% off Your First Funded Account for Futures Trading
We recommend Aquafutures when you want validated candlestick patterns to convert into consistent, executable payouts that match the rules you test. Most traders stitch simulators, brokers, and journals together and only discover slippage and rule mismatches as they scale, and platforms like Aquafutures map your pattern rule set to realistic fills, clear performance gates, and faster access to funded accounts so you can iterate, size, and collect payouts with confidence.
